Whole Roasted Snapper - A Whole Meal

Please, I beg you, do not get squeamish on me for this one. Oven roasting it whole is a great way to get a moist, flavorful fish. Some people shy away from the whole thing. I get it. It’s hard to miss the eyes, the mouth and even the tail. I will admit that this freaks me out a bit, too. It used to be worse for me but now I simply keep my focus on the body and away from the facial attributes. Most importantly, I concentrate on how to honor the fish. The whole fish; because the skin and bones not only impart deep flavors but also protect the fish from drying out by providing natural oils. Another key to increasing its savor and tender texture is stuffing the body with aromatics, such as lemon, onions and herbs. These truly perfume the inner flesh and keep it supple. Additionally, you can cook it en papillote, which mean enveloped in paper. This steams the fish locking in moisture. I simply oven roasted mine this go around.

*NOTE: When buying whole fish, to ensure it is fresh, look for these keys elements.

  • The fish should be bright, with a metallic luster.

  • The eyes should be bright, vivid, clear and bulging. If they are sunken or cloudy, it is old

  • The gills should be bright, wet, pink or red.

  • The smell should be pleasant and mild.

  • If the scales are still on, they should be shiny and not detach themselves.

2 fish, not in the same position as the logo for my main company, 2fish, inc, but there they are together.

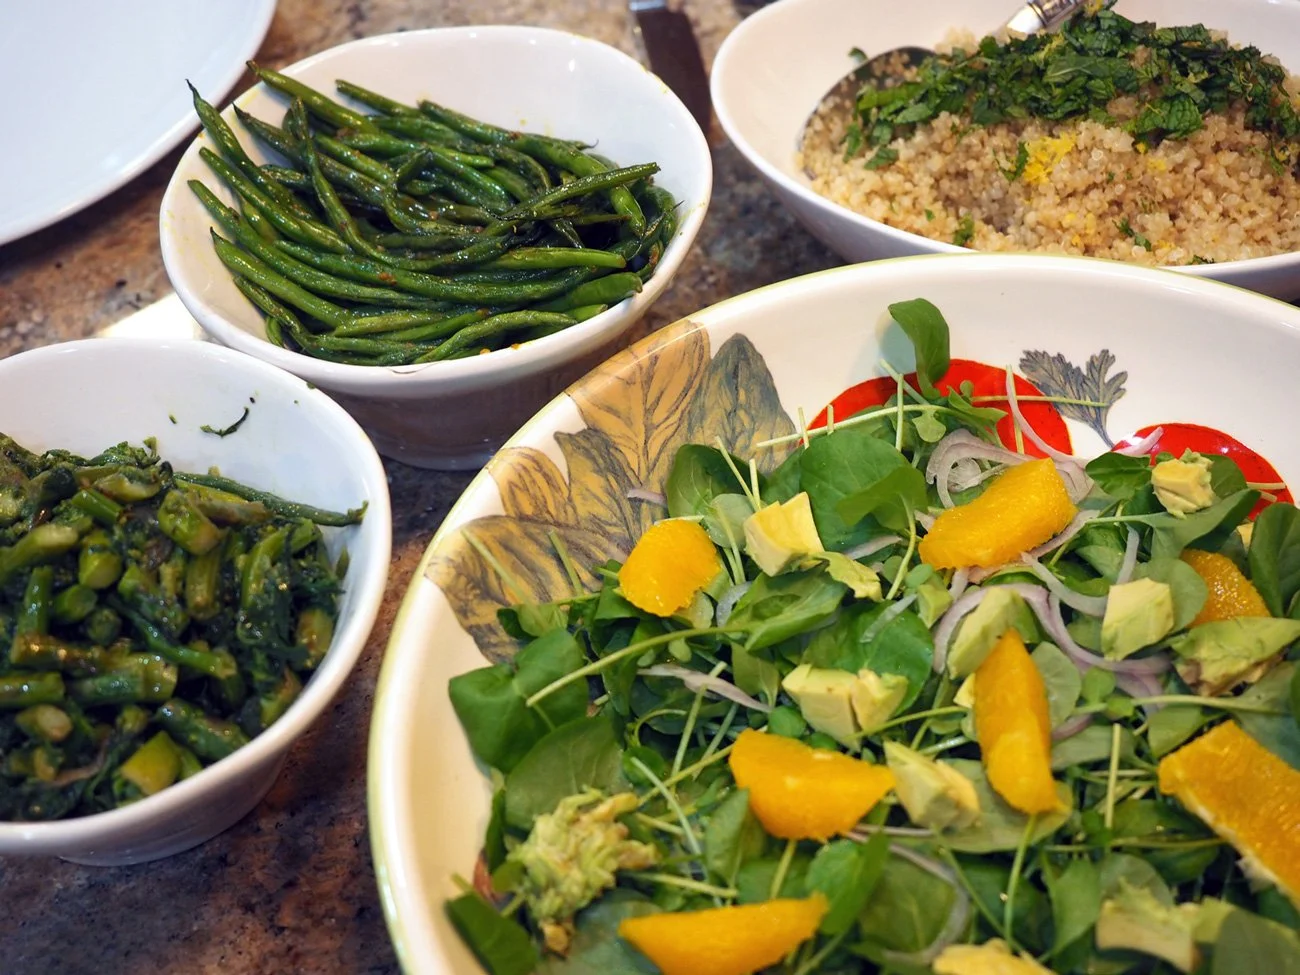
I like making this for a small dinner party. It creates a lovely presentation and produces a succulent dish. I served this with green veggies, a quinoa salad and a watercress salad. If you continue to scroll down, you will find visual instructions for those dishes. These sides were ideal; light and refreshing to accompany the red snapper. Together they make for a perfect Spring meal.

And as my mom pointed out in the comments section, this method can do used with most any whole fish.
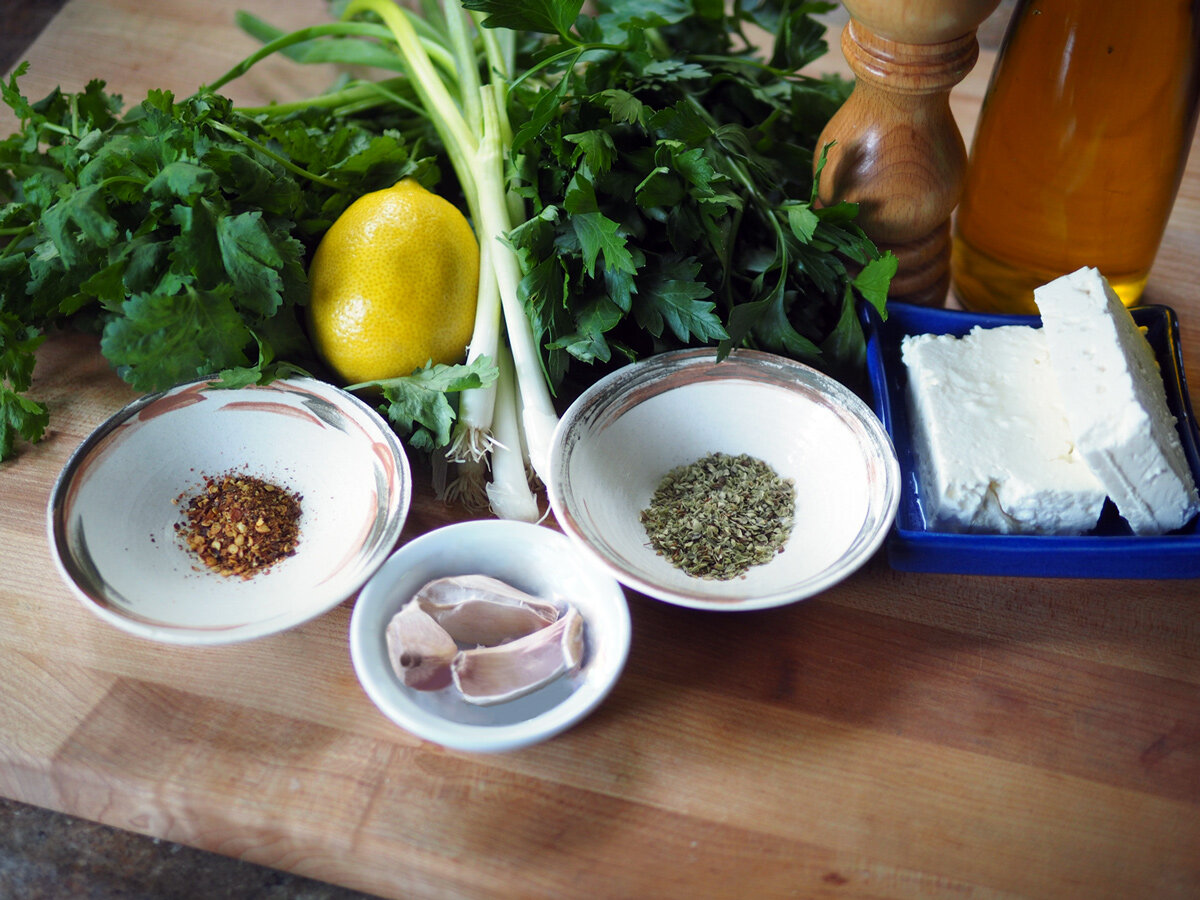

Ingredients

Red Snapper *2-3 lbs for 4 servings
2 Lemons (1 sliced, 1 in wedges for serving)**
1 small Onion
Parsley (or fresh herb of your choice)
Magic 3 (Olive Oil, Salt, Pepper)

*When buying a whole fish figure about 12 ounces to 1 pound of whole fish per person as a main course (as the fish generally yields 50 percent, thus making a 6 to 8 ounce serving) or for 2 people as a first course.

**If you are going to make the Quinoa Salad, then zest the lemon before you slice it for stuffing. Reserve the zest to season the quinoa.

Instructions

  1. Make sure there are no scales on the outer skins of the fish.

  2. Pat dry both the outside and inside of the fish.

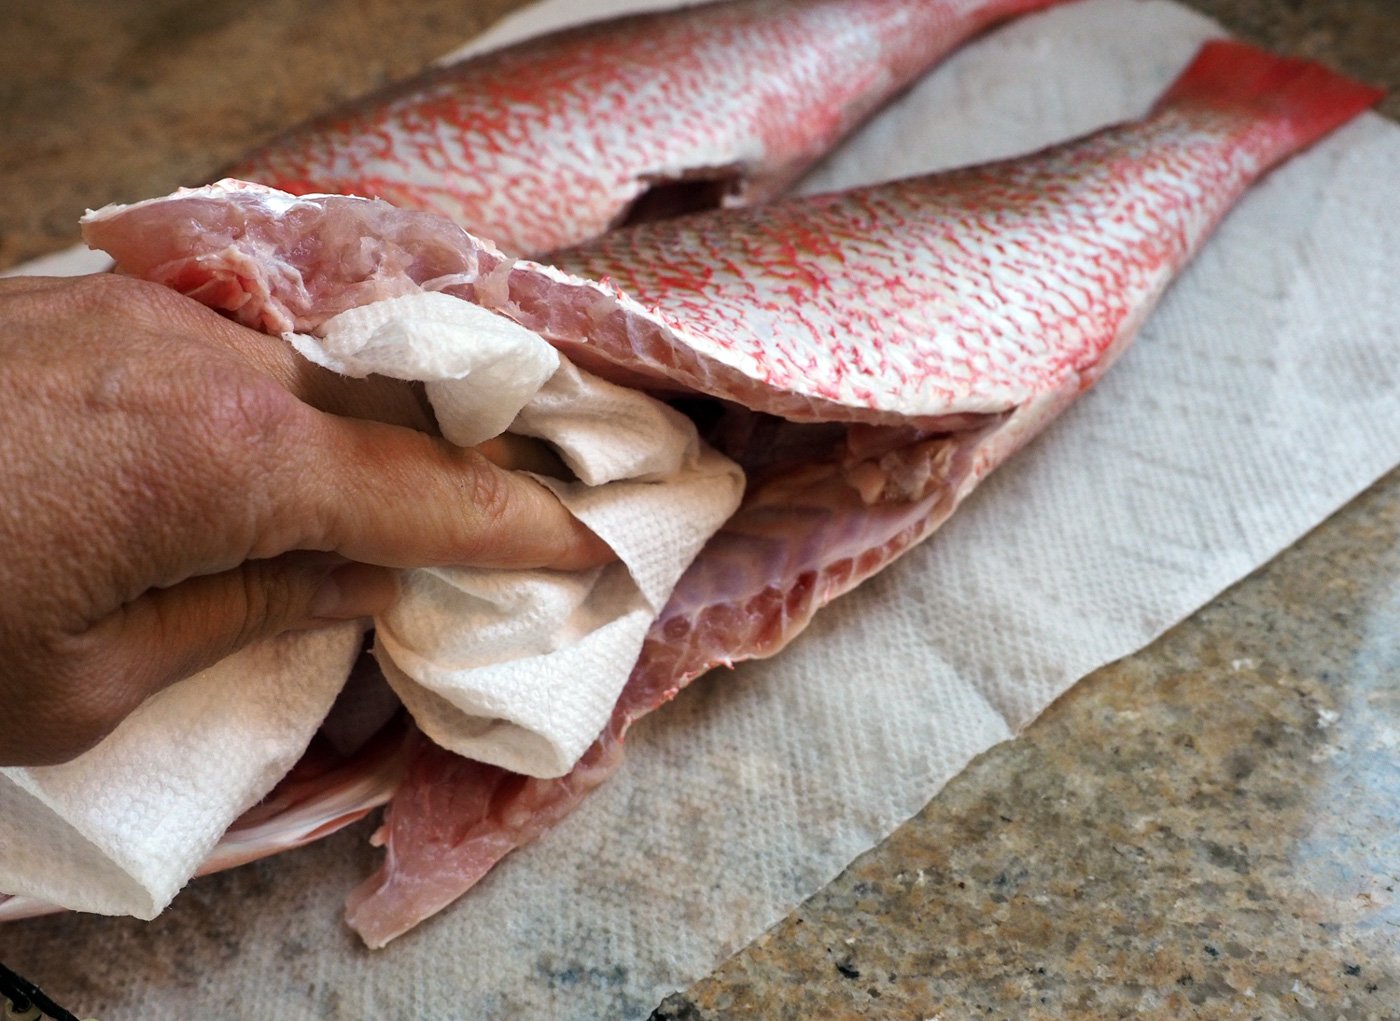
I know it seems counterintuitive to make sure the fish is dry when you want it to be moist, but water just water logs the fish.

3. Cut the onion and lemon in slices

4. Brush the interior with oil. Sprinkle with salt & pepper then stuff with the onion, lemon slices and parsley.

5. Place on a parchment lined baking tray and score the skin making several long slits. Brush with oil and season the outside with a good amount of pepper, and salt. You can also envelope the fish in a tin foil or parchment paper pouch for the en papillote approach.

6. Bake at 425 degrees for 18-20 minutes or until the internal temperature is 145 degrees.

You can place the whole fish on a platter lined with greens or herbs, or you can debone it.

Whole roasted Red Snapper
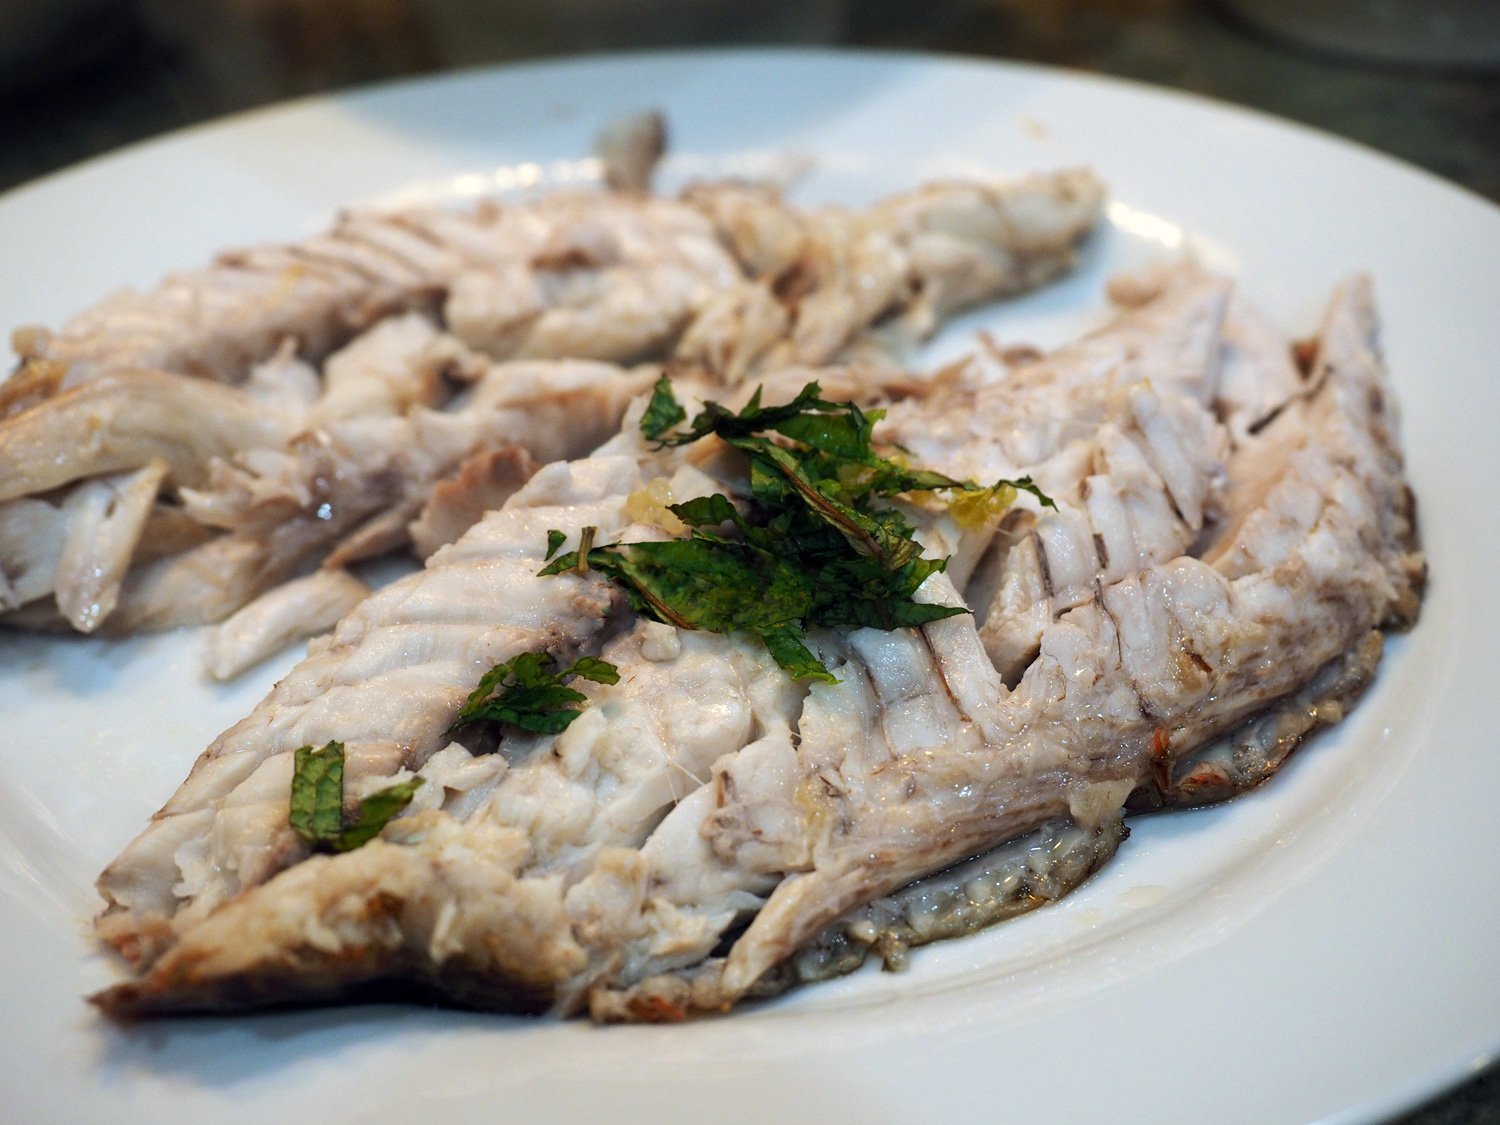
Deboned into filets

Serving suggestions:

Of course any sautéed green vegetable will pair nicely. I made both broccoli rabe and string beans prepared in a simple sauté of olive oil, garlic slices, salt and pepper. The other accompaniments were a side of quinoa and fresh baby watercress salad. Below are the quick visual instructions for the latter two dishes.

Quinoa with Sautéed Onions, Lemon Zest & Mint

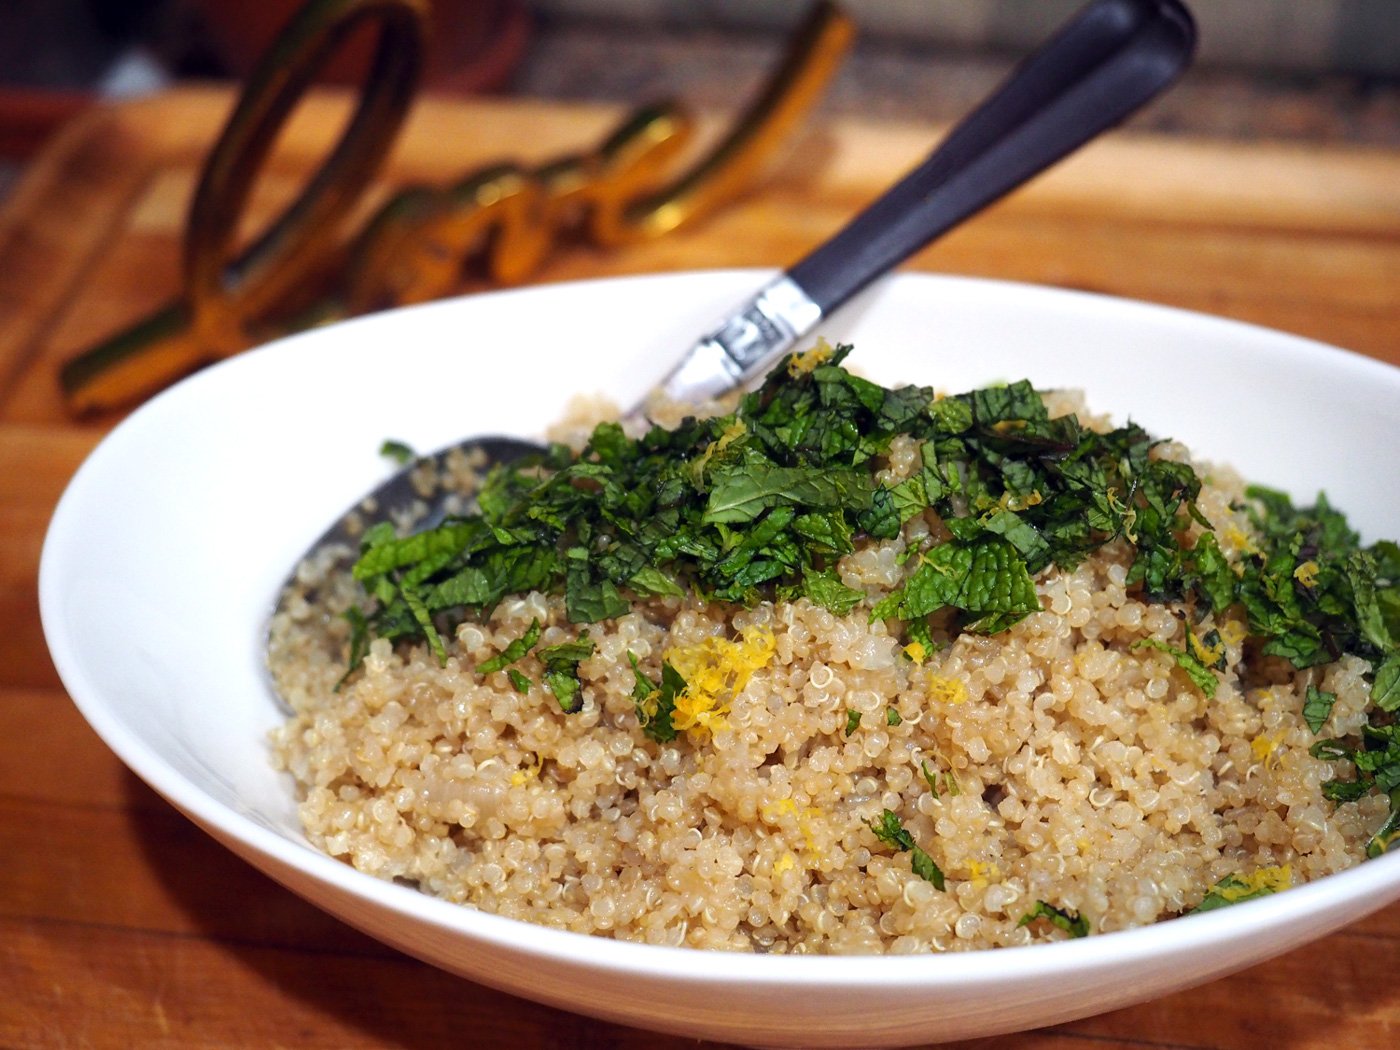
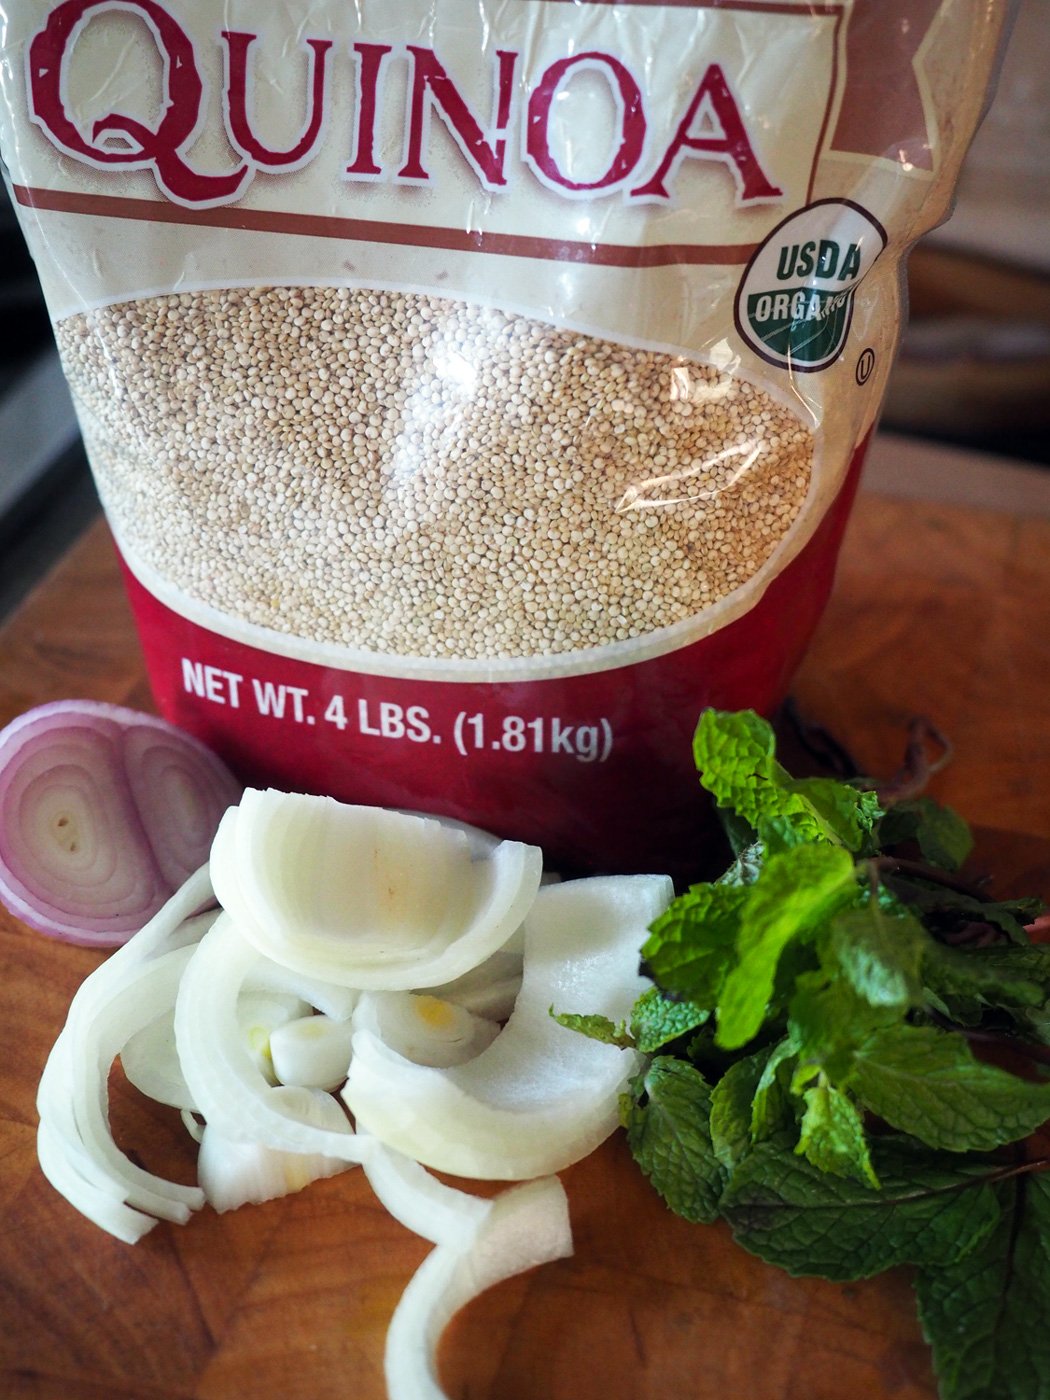
Quinoa is a wonderful source of protein and a fairly neutral flavor that is enhanced by the addition of herbs.
Ingredients

1 c Quinoa
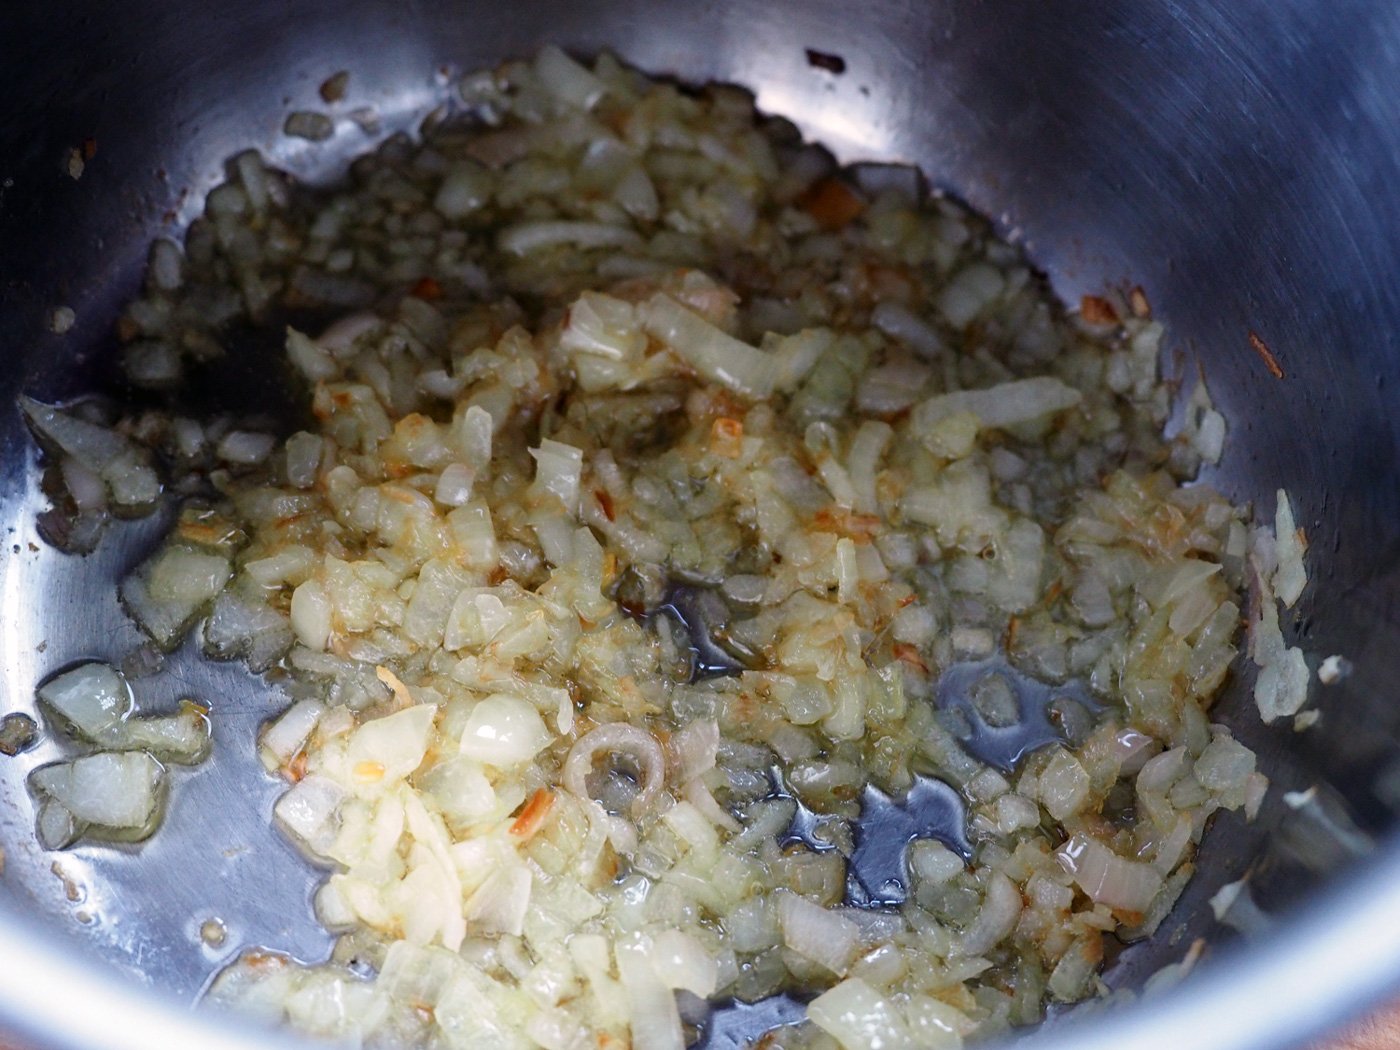
1/3-1/2 c chopped onion/shallot
2-3 t lemon zest
4-6 T lemon juice (depending on your taste
6-8 T mint, minced (mixed in and some for top)
Olive oil, salt and pepper

Instructions

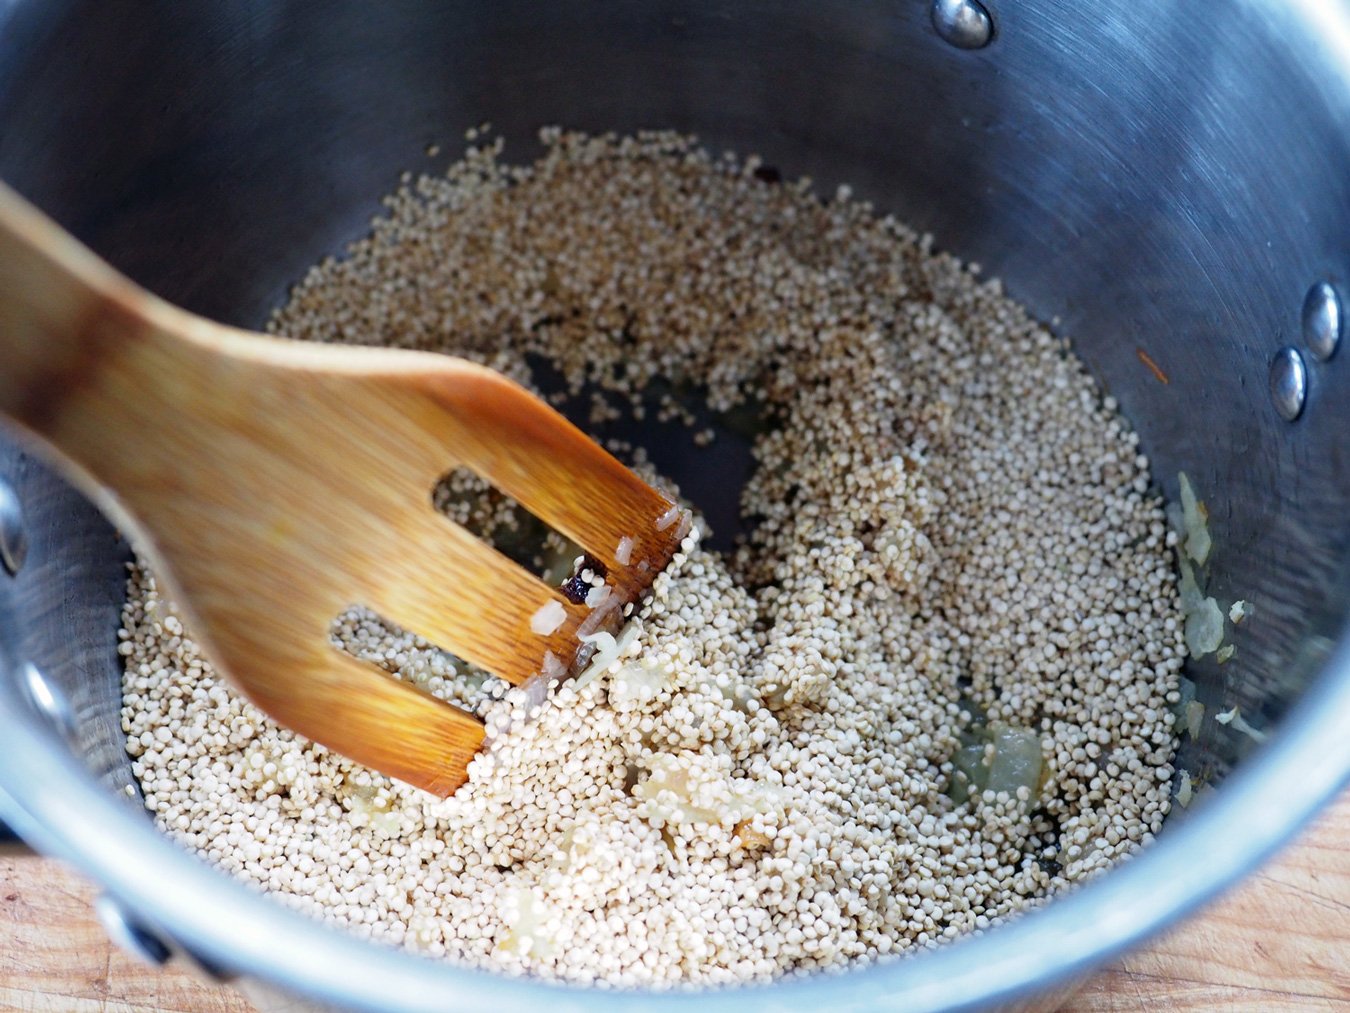
  • Sauté onion and/or shallot, add the quinoa and water and cook according to the package. (I usually measure 1 cup of quinoa to 1.5 c water)

  • Bring to a boil, cover and lower to simmer cooking for 15-18 minutes until water is absorbed and quinoa is fluffy.

  • Then zest the lemon, squeeze some of the juice, season with salt and pepper and toss in the chopped mint and fork fluff. Save some mint for the top decoration.

Baby Watercress, Avocado & Orange Segment Salad with a Citrus Dressing

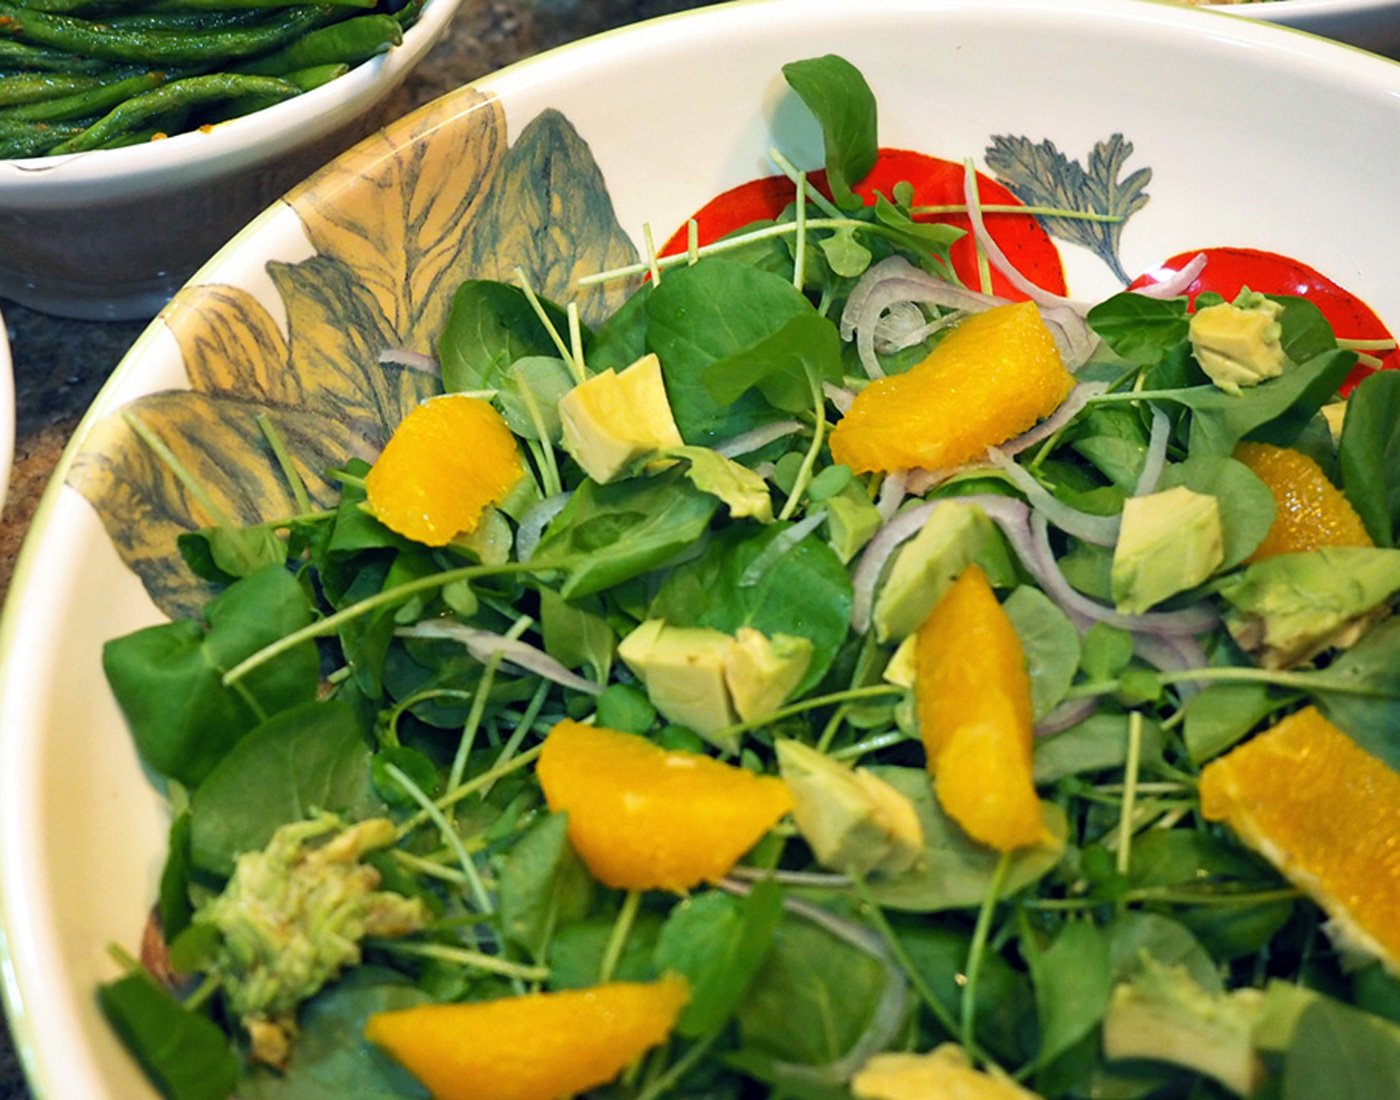
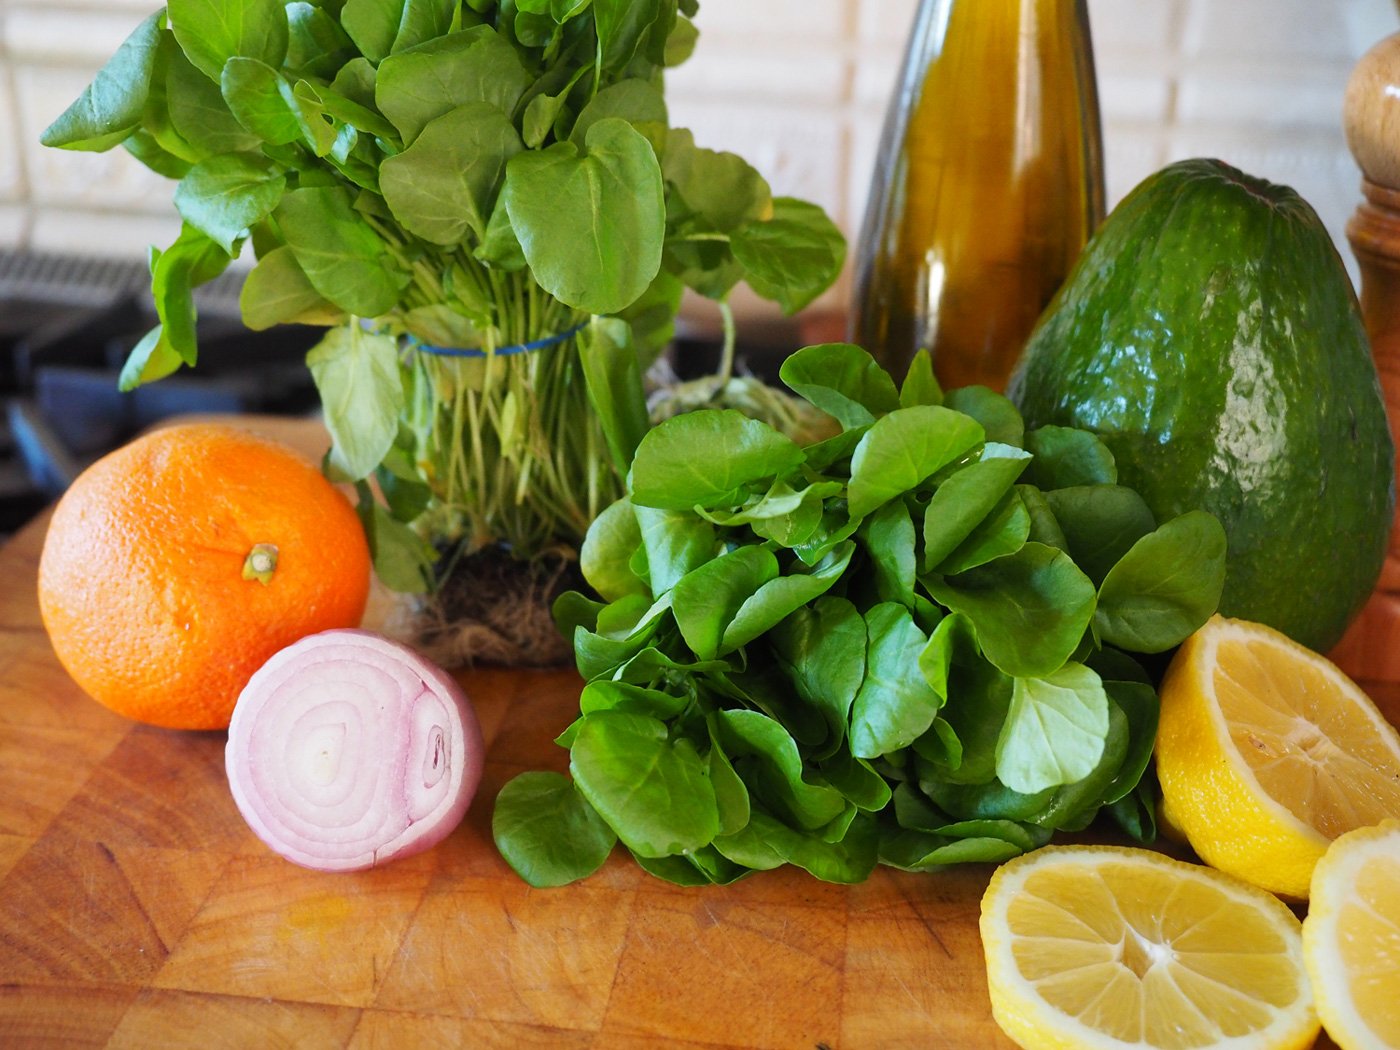
When making finger sandwiches, I prefer regular watercress as it has more of a textural bite to it as well as a sharper, peppery flavor. For salad purposes I prefer Baby Watercress. It is much more delicate. This salad is all about light and bright, and the citrus does that beautifully.

Ingredients

2 bunches baby watercress
1 avocado, cut in small chunks
1 shallot, thinly sliced
1 lemon, zest and juice
1 large orange, segmented

Instructions

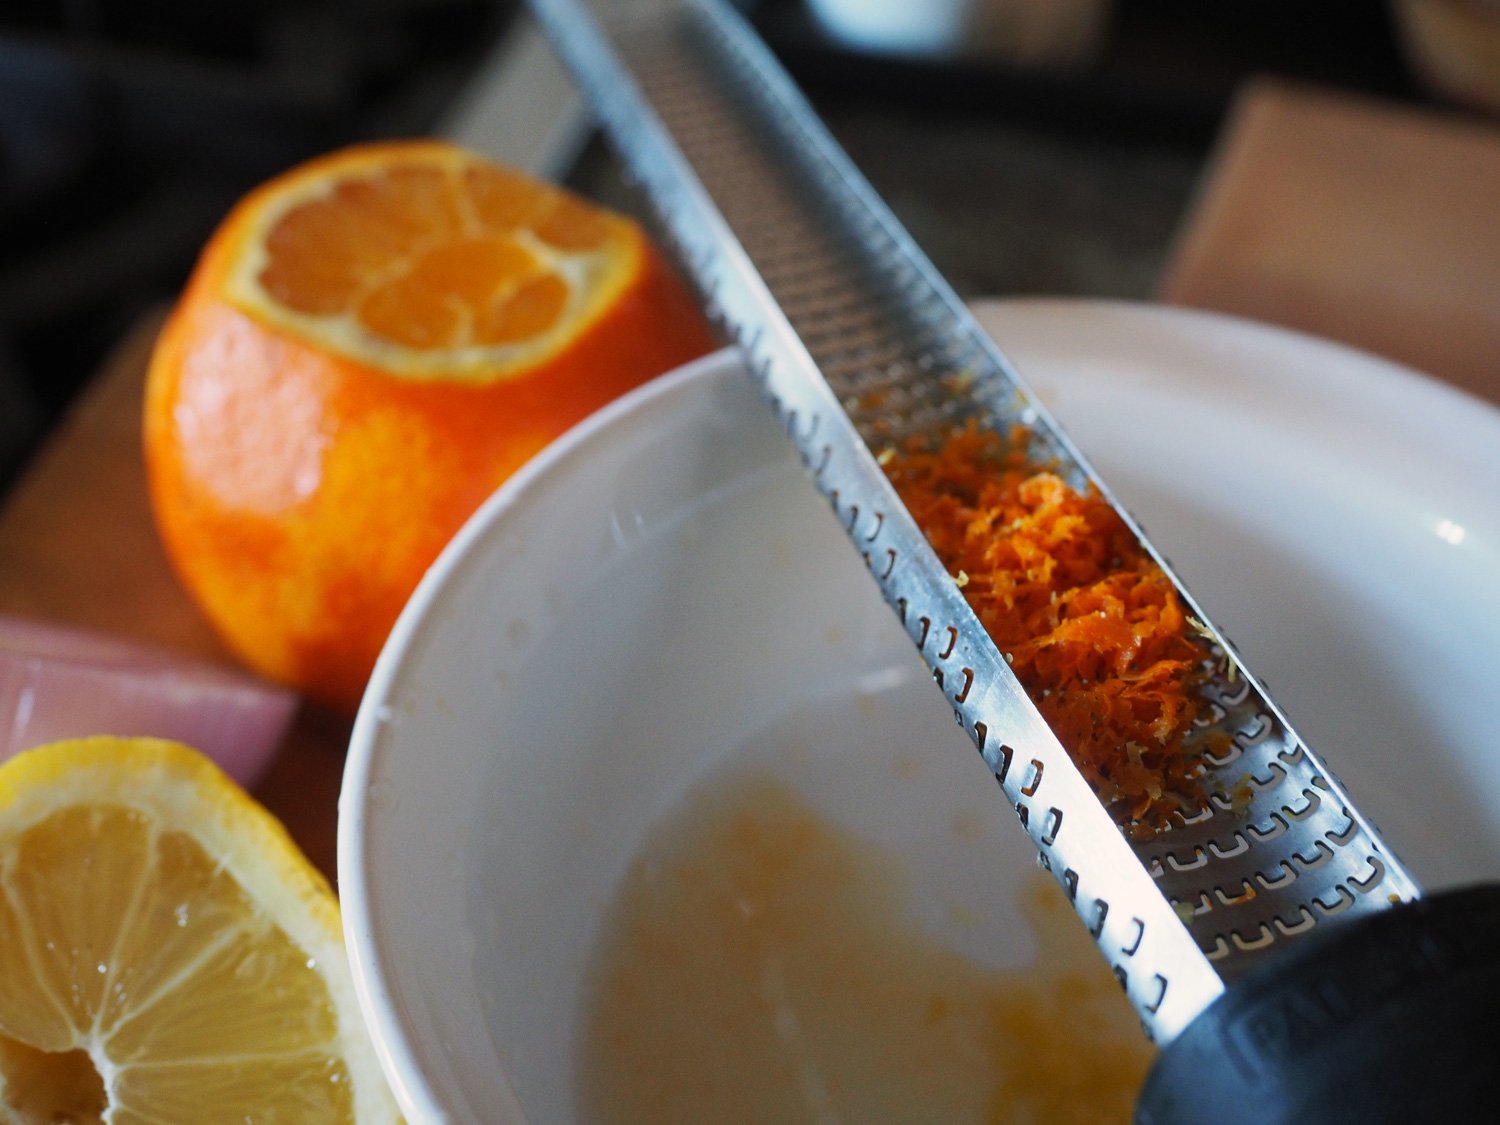
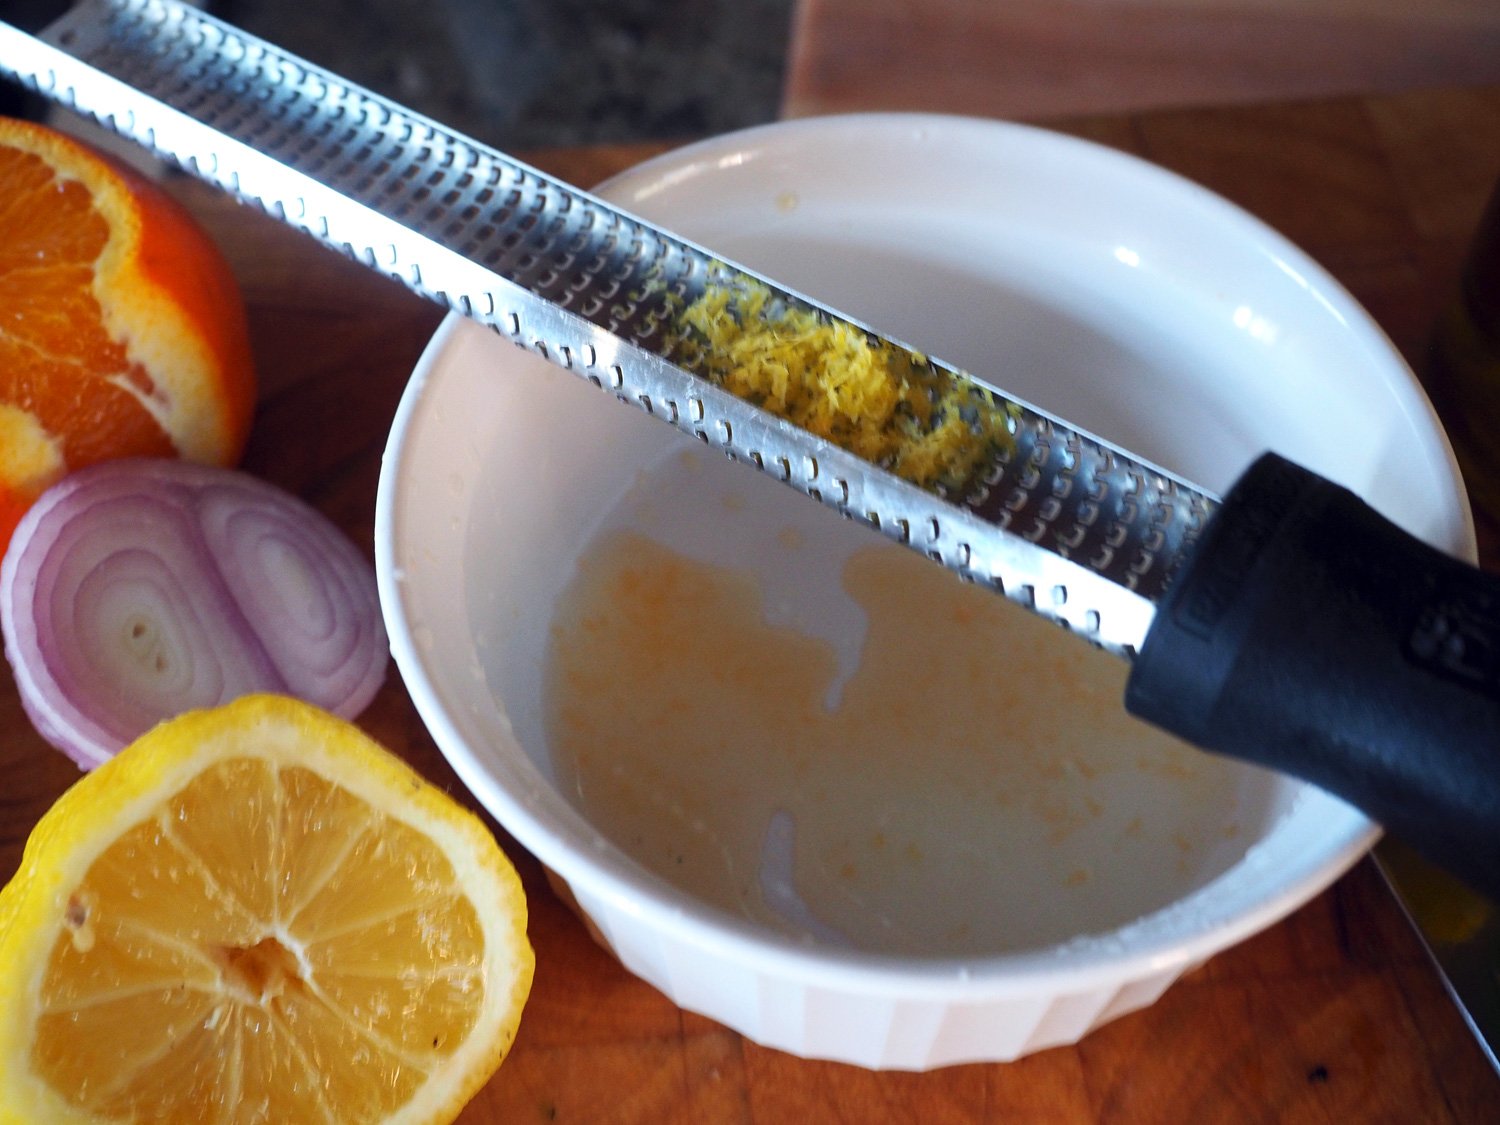
  • First zest the orange and reserve for the dressing.

  • Then as you segment the orange do it over the dressing bowl to catch all the juices, and squeeze any juice from the remaining pulp.

  • Thinly slice the shallot (or red onion if that’s all you have)

  • Cube the avocado (squeezing some lemon to stop it from browning).

  • Assemble the salad in a bowl, then add orange juice, lemon juice, salt, pepper and olive oil to the orange zest and whisk until emulsified. That simple.

This is a perfect Spring or Summer evening meal. It would be a lovely Sunday lunch idea, too. The fish is delicate and moist. The sides are light yet filling. The citrus brightens the whole meal up, and if you have leftovers, all this would make a wonderful taco lunch.


Marinated Feta

final.marinated.feta2.jpg

Over the past year, I’ve been whipping up a little marinade for the plain feta cheese I buy. Of course, I still use plain feta in a slew of other ways, but for months I took real joy in serving it as an appetizer all on its very own. Feta has an intensely tangy flavor but it is a simple cheese that I wouldn’t normally serve on just plain. The way to make something simple sing is to joosh it up a bit.

I landed on the idea to smother it in flavor while I was reminiscing about how I used to marinate olives when I lived in Miami. Back then the city was not the culinary mecca it has become today, and marinated olives weren’t as readily available. I know that seems hard to believe given their ubiquity, but that was way before there were so many cool markets with speciality items or olive stations. So, I would buy a variety of plain olives and then make a citrus, spice oil mixture in which to marinate them. Heck, when you don’t find what you want or need, you simply have to rely on your own talents to create it. That’s what I did then, and continue to do now. That old Miami olive mixture made me think of how yummy something similar would be on feta cheese.

*Side note about feta that I just learned from my Bulgarian brother-in-law, Peter. Much like Champagne, the word feta can only be used when referring to the cheese if it is produced in a traditional way in particular areas of Greece. Who knew? Now we do. All other cheeses made in different parts of the world can only state that they are fresh sheep’s or goat’s milk cheese ripened in brine. So interesting, and a tidbit I thought I would share. That said, as much as I would like to be a stickler for food correctness, it’s much easier to write feta, rather than a longer description of the cheese. Is that bad?

Back to the marinade. As I stated, I’ve made this before and it was enjoyed by my guests, but I noticed a real uptick in its wow factor. Whenever I’ve offered it up, it has been a home run. So much so that I was forced to make it in much larger quantities. Once people get a taste of it, it’s like tortilla chips and salsa, you just can’t stop eating it.

The ingredients that provide major zing: Cilantro, lemon, scallions, parsley, black pepper, olive oil, feta, oregano, garlic, red pepper flakes.

The ingredients that provide major zing: Cilantro, lemon, scallions, parsley, black pepper, olive oil, feta, oregano, garlic, red pepper flakes.

Ingredients

7 oz. Feta cheese (sheep’s milk cheese in brine. I prefer the French one, as it it softer and milder)
*if you wanted to double the about of cheese the below marinade ingredients will be enough

2 T Scallions, sliced thinly
1/2 c Clilantro leaves loosely packed, minced (3 T)
1/2 c Parsley leaves loosely packed, minced (3T)
1-2 Garlic cloves, crushed (1 t)
2 t Dry Oregano
1/8 t Red pepper flakes
Black pepper
1 t lemon zest
2 t lemon juice
2/3 c olive oil
a few twists of ground pepper

It’s the small touches of red pepper flakes and garlic that really bring a zing to this dressing.

It’s the small touches of red pepper flakes and garlic that really bring a zing to this dressing.

Instructions

I feel silly telling you what to do, but here goes.

Cut, chop, mince, crush according to ingredient list above.

It is so essential to use the freshest ingredients, always, but more so when you are making a raw dressing like this one.  Freshness and brightness are key.

It is so essential to use the freshest ingredients, always, but more so when you are making a raw dressing like this one. Freshness and brightness are key.

Give the herbs a good mince, and the scallions a thick slice.

Give the herbs a good mince, and the scallions a thick slice.

The zest and juice of lemon adds a brightness and acidity that rounds out all the flavors.

The zest and juice of lemon adds a brightness and acidity that rounds out all the flavors.

Gently cube the feta and place in an airtight container. (I prefer a glass container.)

Salty, briny, delicious French feta

Salty, briny, delicious French feta

You can make the cubes any size you want.  I like small ones.

You can make the cubes any size you want. I like small ones.

Combine all the ingredients and whisk together.

Crushed garlic

Crushed garlic

Dry oregano

Dry oregano

Red Pepper Flakes

Red Pepper Flakes

oil.jpg
Add all the ingredients and whisk together until combined.

Add all the ingredients and whisk together until combined.

Pour over the cheese, lovingly.

Pour the mixture all over the cheese ensuring every last piece is covered.

Pour the mixture all over the cheese ensuring every last piece is covered.

Note, that there is no salt in the ingredients. That is because the feta is brined in salt and you definitely do not need any additional. However, since the dressing amounts above make about twice what you need to marinate 7 oz of feta, you can do one of two things. You can add salt to the remaining marinade and use it to top fish, chicken or pork. Or you can simply double the about the feta, which is what I do because 7 oz may be enough for your crew, but it’s definitely not whenever I serve it. When you are ready to serve this up, remove it from the fridge at least 15 minutes prior so the oil comes back to room temp.

final.marinated.fetaCU.jpg

When I say it can be slathered on everything, I mean it. Naturally, it’s divine on crusty bread. A no brainer. But I’ve seen guests dollop it on salad. Eat with grilled shrimp. Top polenta, rice and pasta with it. Need I go on. As a matter of fact, we social distanced at my sister, Alyssa’s house this past weekend, and we literally had a slew of foods that this feta worked so well with. Pasta with pesto and shrimp, chick pea salad with fennel and herbs, sautéed string beans, a big salad and grilled sausage. We all made a big plate and mixed it all up together, and amazingly it was a medley in our mouths.

I recently made breakfast tortilla/tacos from leftover roasted veggies and decided to add some zing by topping them with this marinated feta. It took these already delicious tacos to another level.

Roasted cauliflower, onions, sautéd spinach on corn tortillas topped with marinated feta.

Roasted cauliflower, onions, sautéd spinach on corn tortillas topped with marinated feta.

I love when something takes on a whole new versatility. Marinated ‘feta’. It’s a very good thing!

Egg Salad with Zing

egg.salad.final3.jpg

As we approach the summer months, tentative thoughts of picnics, BBQs and the like twinkle in our minds. Conjured up images of burgers and buns alongside heaps of summer salads; macaroni, potato and the ubiquitous egg salad. Sure this Memorial Day celebration and seasonal BBQ’s may look different this year, but one thing is certain, we still need to eat. And we definitely need to celebrate and rejoice in life, in being healthy, and any and all good fortunes.

No matter how you decide to celebrate this upcoming Memorial Day, adding a little twist to an old salad standby might be a welcomed change. Although mayo based salads are often the usual accompaniment to BBQs, they rarely grace my table. I seldom, or should say, almost never eat them. Egg salad, most of all. Two main reasons, really. For a long time, I’ve had a food sensitivity to eggs, so I guess that’s a pretty good, and I would venture to say, big rationale. Then, of course, there is the mayo portion, which naturally is made with eggs. The other salads can easily be reinvented/reworked using a blend sour cream and yogurt. But when it comes to egg salad, there’s no getting around the egg portion, and the globs of mayo. Given that eggs make a double appearance in this traditional dish, I’ve steered clear for quite some time. But recently, I starting introducing these shelled wonders back into my diet, and things seem to be ok. With the weather finally showing signs of Spring, Summer and warmth, I figured now was the right time to give a twist to a traditional lunch salad.

I like texture, and I like zing… And I especially like them in my food. When thinking about the typical egg salad neither of those come to mind. In true ‘what do I have’ fashion, I pulled out of the fridge the following line up to answer the call to texture and zing.

Eggs | Mayo | Mustard | Pickles | Capers | Olives | Celery | Lemon

The line up; pickles, capers, mayo, eggs, celery, olives, mustard and lemon.

The line up; pickles, capers, mayo, eggs, celery, olives, mustard and lemon.

Ingredients

Yields 1.5 c | approx. 3-4 servings

3 hard boiled eggs
¼ t lemon zest
2 T lemon juice*
¼ cup fine dice celery
1 t capers, chopped
2.5 T chopped dill pickles
2.5 T chopped green olive (I used Spanish Manzanilla olives)
¼ c mayo
1 t mustard (For even more zing, use grain mustard)
(I would have added about 2 T diced red onion if I had it.)
Pepper to taste

Instructions

  1. To get a perfect hard boiled egg, place the eggs in a pot and fill with cold water just enough to cover. Bring to a boil, then immediately remove from the heat. Cover and let stand for 14 minutes. Then submerge in ice bath to both stop the cooking and to make it easier to peel.

  2. Prep all your ingredients in the famous mise en place way, getting everything ready.

I love using these perfectly sized handmade ceramic bowls by Miller Pottery.

I love using these perfectly sized handmade ceramic bowls by Miller Pottery.

As you can see, some bowls are deeper, while others smaller.  Choose bowls of varying small sizes to suit your ingredients.

As you can see, some bowls are deeper, while others smaller. Choose bowls of varying small sizes to suit your ingredients.

3. Combine the mayo, mustard and lemon juice/zest together and blend. Add pepper to taste.

As I mentioned, I like a less thick mayo style, so I used 2 tablespoons of lemon juice, making a thinner, lighter dressing. Adjust to your taste.Photo credit: JuanCarlos Casas/lookasithappens

As I mentioned, I like a less thick mayo style, so I used 2 tablespoons of lemon juice, making a thinner, lighter dressing. Adjust to your taste.

Photo credit: JuanCarlos Casas/lookasithappens

Look at how gorgeous those yellow yolks look.  Perfectly done.

Look at how gorgeous those yellow yolks look. Perfectly done.

Smash to your hearts content. i like mine on the chunkier side.                                                     Photo credit: JuanCarlos Casas/lookasithappens

Smash to your hearts content. i like mine on the chunkier side. Photo credit: JuanCarlos Casas/lookasithappens

4. Once the egg are done, smash with a fork to the texture you desire and add all the remaining ingredients saving the mayo mixture for last.

In go all the tangy items, olives, capers, pickles. NOTE: all these have a decent amount of saltiness to them, which is why no additional salt was needed.                                                                                               …

In go all the tangy items, olives, capers, pickles. NOTE: all these have a decent amount of saltiness to them, which is why no additional salt was needed. Photo credit: JuanCarlos Casas/lookasithappens

Crunchy celery in.                                                                                                                          Photo credit: JuanCarlos Casas/lookasithappens

Crunchy celery in. Photo credit: JuanCarlos Casas/lookasithappens

Creamy, zesty dressing drizzled.                                                                                                      Photo credit: JuanCarlos Casas/lookasithappens

Creamy, zesty dressing drizzled. Photo credit: JuanCarlos Casas/lookasithappens

*The two tablespoons of lemon juice makes a loose mixture.  I don’t like mine too dry nor too much mayo.  If you like yours less wet and with a thicker mayo texture then cut down the lemon juice.


Serve this with your favorite crackers. You know by know that my gluten free go to is Mary’s Gone Crackers. Naturally, a bun, or whole wheat toast would be great options. However, neither of which can be found in my house.

For more crunch, devour this with Mary’s Gone Crackers. Or serve it up on celery stalks.

For more crunch, devour this with Mary’s Gone Crackers. Or serve it up on celery stalks.

For an even healthier choice that will still give you a crisp crunch, fill lettuce leaves with the egg salad. Less carbs more freshness.

Egg Salad with Zing.

Egg Salad with Zing.

A nice lighter lunch served alongside some ice cold, crispy grapes.  Fruit is a great accompaniment to a creamy or mayo based salad.  I’m a fan. Check out some other salads using grapes.  Chicken Salad with Fruit & Nuts or Graped Up Bibb Salad.

A nice lighter lunch served alongside some ice cold, crispy grapes. Fruit is a great accompaniment to a creamy or mayo based salad. I’m a fan. Check out some other salads using grapes. Chicken Salad with Fruit & Nuts or Graped Up Bibb Salad.

Pro Tips & Time Saving Ideas

pesto.small.containers.jpg

First and foremost, I hope that everyone is safe, and healthy. These are extraordinary times, which require patience, perseverance, faith and a deep sense of knowing that we will heal and return to a new way of living armed with more knowledge and information, and certainly with more compassion.

Since we are still in a lock down situation, keeping our distance and doing what we can to remain safe, we are finding different ways in which to manage our daily routines. That includes trying to make the most out of the food we are able to buy. I thought I would share some tips and time savings ideas that might help.

In our area, we have not been able to purchase some items, while others we can get in large quantities. And because of that, I’ve come up with ways to make sure I don’t waste anything. Below are a few that I’ve implemented.

Also, because things have been a bit wonky, I haven’t been taking photos with my professional camera. Sure, there is a list of reasons why, but I definitely won’t bore you with those details. Instead I’ve been using my phone, and clearly there is a big difference in quality. So, disclaimer right up front, the images may not be the best but I think the ideas are valuable and worth including the images. As we all know - a picture is worth a thousand words. (And yet I still use words, and lots of them.)

Let’s get started:

Pro Tip #1 - Buy citrus in larger quantities and freeze

How many times have you wished you had just a little squeeze of lemon, or lime? I have often found myself in that exact situation, which is why I started buying huge bags of limes and lemons. With this helpful trick, you will never be caught without. But this tip is not only useful if you buy in large quantities. It is also great to fold into your routine when the citrus you do have will go bad before you have a chance to use it. This method will save you from having to toss and waste it.

First things first, wash them. That’s right. Why wash the outside of citrus when you are using the juice from the inside?

Two reasons:

  1. Even if you are only using the juice, the outside has been touched by many hands and exposed. When you squeeze some of the juice might run down the outside rind, plus your hands are touching the outside rind. I’ve practiced this tip before the coronavirus, but it is especially important now.

  2. If you are going to zest the rind, washing is ESSENTIAL because you are going to consume the rind. It goes without saying that anything you will eat needs to be washed.

Next, I select several to keep on hand for daily use, placing them in a basket in a cool, dry drawer. The rest I squeeze into a large measuring cup and then pour the juice into silicone molds to freeze. (If you don’t have silicone molds then ice cube trays do the trick. I do find that the silicone makes it easier to pop the cubes out.) You can choose whatever size you want. I use both tiny molds and large oversized ice cube molds so that I have choices.

Once they are frozen, pop them out and place them into labeled freezer bags for future consumption in a variety of ways, such as:

  • Add to your tea

  • Use for cocktails

  • Add to sauces

  • Use for salad dressing

Note: I have also zested the rind and included that in some of the juice cubes, for that extra added tang.

Pro Tip #2 - Herbs Now, Herbs Later

For whatever reason, I haven’t been able to get any other herb except basil, and it comes in 1 lb. size. I love basil, but that’s a whole lot of basil. I decided to take full advantage of having this tasty herb on hand. I used it fresh in several dishes, (which will be featured in my next post), but there was just so much I could use before it was going to go south on me. That’s where this next tip comes in handy.

For the remaining abundant leaves, I decided to make a big batch of pesto, using walnuts, garlic, salt, pepper, lemon juice and oil. I then split that amount in thirds, adding Parmesan cheese to only one portion, and leaving the other two without. I will explain why, keep reading. Again, we will be using the same method as with the lime and lemon juice. This time placing the batch with cheese into a larger container with an appropriate amount to be used in the future for pasta. The other ‘without cheese’ portions I poured into the smaller silicone molds, and small plastic containers. You can employ this method using cilantro or parsley as well. For those herbs, you can keep it simple and just blend the herb with garlic, oil, salt and pepper.

Once the cubes in the molds are frozen, simply pop them out and place in labeled freezer bags. (Note: labeling is key. You may think that you will remember what’s in a container but if it’s been in the freezer for a while you can’t rely on memory. Plus, you do want to put the date so you know how long it’s been in the freezer.)

The reason for not adding cheese to the entire batch is that basil, garlic, walnuts and oil combo is way more versatile than with cheese. This yummy green goodness of a mixture can be used in a litany of other ways, such as:

  • Add basil flavor (when you don’t have fresh on hand) to sauce

  • Baste a roasted chicken

  • Use it to finish a soup for a hint of herbal flavor

  • Place it in any fish en papilotte

Pro Tip #3 - Avoid a Mess: Use of a Container & Multiple Stacked Baggies
Mango Madness

When mango are in season, I buy plenty. Then I cut them up into cubes and freeze. Since cutting and placing them into baggies can get messy, I employ the trick of using a wide mouth glass and pre stacking the bags into the glass one on top of each other. This way once I place the cut mango into the bag, the next bag is there ready to be filled. Not only is this time savings but it really keeps the whole process streamlined, clean and without getting a sticky mess all over. This method can be utilized for any number of foods that you are making multiple packages.

Of course, there are all the obvious uses for frozen mango chunks, but I’ve a given you few more.

  • Sorbet

  • Ice Cream

  • Smoothies

  • Salsa

  • In a salad with nuts & seeds

  • Cocktails

I hope these tips prove helpful, or have even given birth to some of your own brainchild methods.. All of these ideas and tips are really about saving time. It’s about doing the work once and enjoying the fruits of your labors both now and in the future.

Effort Once = Rewards Multiplied

DP-stirredwlove-ID1.jpg


Versatile Summer Crunch Salad

I think it is safe to say that summer has finally arrived here in the Northeast. We wait long and patiently. I’ve finally put away my heavy sweaters and traded cozy fireplace nights with dreams of warm days and cool nights. I also started dreaming up dishes that cool the palate and refresh during those toasty days. Chalk it up to another one of those times when I just started pulling whatever I had to create a salad for lunch. Now remember, salad is a term that sums up any combination of food that is cut up in small pieces, and can be served cold, room temp or even warm. Think about it; a salad can be of fruit or lettuce. It can be potato or pasta. Bean or tabouleh. You get the picture. The word salad is probably one of the most versatile words I know in the culinary world. So why not create a versatile salad, one that can be used in a variety of ways.

Here goes. As you know from other salads I’ve made, I cut each ingredient in ways that combine well for that particular salad. Some items sliced, others diced. In this salad, in order to create a chunky bite- ful, cut all the veg to approximately the same size.

The line up: Fennel, red onion, scallions, mini bell  peppers, English cucumber, celery.

The line up: Fennel, red onion, scallions, mini bell peppers, English cucumber, celery.

Ingredients

1 English cucumber, seeds removed, cut in cubes
7 mini bell peppers*, seeds removed, cut in pieces
1 heaping c fennel, stalks & bulb, cut in chunks
2 scallion, sliced
1/4 c red onion, diced
3 celery stalks, cut in pieces

* If you don’t have the mini peppers, use one regular sized red pepper

Dressing
3 T fresh lemon juice
1.5 T fennel fronds, minced
1/4 c olive oil
1/2 t salt
1/4 t black pepper

I feel silly even writing the title ‘Instructions’ and giving a step by step since all this is chop and dress. Maybe I should just leave it at that. Chop. Whisk. Dress.

For some salads I leave the seeds in an English cucumber. For this one, no seeds. I use a demitasse spoon to scrap the seeds because it’s the perfect size. Then I cut down the center lengthwise and then cut cubes.

For some salads I leave the seeds in an English cucumber. For this one, no seeds. I use a demitasse spoon to scrap the seeds because it’s the perfect size. Then I cut down the center lengthwise and then cut cubes.

Chop all your vegetables and place in a bowl. As I mentioned, for this salad, the key is chopping everything into bite sized chunks. That helps to create the crunch factor.

Cucumbers

Cucumbers

Mini bell peppers

Mini bell peppers

Red onion

Red onion

Scallions

Scallions

I used both the fennel stalks and the bulb, chopping them in chunky rounds.

I used both the fennel stalks and the bulb, chopping them in chunky rounds.

For the dressing, just whisk together all the ingredients and pour over.

Super simple, fresh mix of lemon juice, fennel fronds, salt, pepper and olive oil.

Super simple, fresh mix of lemon juice, fennel fronds, salt, pepper and olive oil.

Pour and mix and sit and think of all the ways you will use this salad.

Pour and mix and sit and think of all the ways you will use this salad.

Chunky, crisp, refreshing with lots of flavors mixed up in every bite.

Chunky, crisp, refreshing with lots of flavors mixed up in every bite.

So why is this versatile? Because it can be the base to bigger salads or to fill out a lunch plate as I did. I grilled up some asparagus, sliced some avocado and spooned a heaping of this crunch salad for a satisfying lunch.

Then the next day I included it on a lunch plate for JuanCarlos which featured salmon, arugula as a base with the crunch salad on top alongside some store bought tabouleh. Now that is a lunch for a king. King JuanCarlos.

lunch.salad.salmon.jpg

But in case you need a few other ideas:

  • Add chick peas, or make it a multi bean salad adding black beans and cannellini

  • Add tuna and stuff the whole kit and kaboodle into a pita

  • Cook up some pasta shells and toss them all together

  • Use the full leaves of Boston or Romaine and fill them with this mixture

Ok, you get it. That’s a start. I trust you will come up with a few of your own. For now, start with the base and build from there. Salad: versatile no matter how you dice it.

Happy Summer!